Introduction
If you're an iPhone user, you might have come across the term "automatisation iPhone raccourci" or "iPhone shortcut automation" in English. This feature allows you to automate tasks on your iPhone by creating shortcuts. However, there might come a time when you want to delete these shortcuts. In this article, we'll show you how to do just that.What is Automatisation iPhone Raccourci?
Automatisation iPhone Raccourci is a feature on iPhones that allows you to create shortcuts for tasks that you frequently perform on your device. For example, if you always open a specific app when you wake up in the morning, you can create a shortcut for it so that it opens automatically when you tap the shortcut.How to Access Automatisation iPhone Raccourci
To access Automatisation iPhone Raccourci, follow these steps:1. Open the Shortcuts app on your iPhone 2. Tap on the "Automation" tab at the bottom of the screen 3. Here, you'll see all the automations that you've createdHow to Delete Automatisation iPhone Raccourci
To delete Automatisation iPhone Raccourci, follow these steps:1. Open the Shortcuts app on your iPhone 2. Tap on the "Automation" tab at the bottom of the screen 3. Find the automation that you want to delete and swipe left on it 4. Tap on "Delete" to confirm that you want to delete the automationWhy Delete Automatisation iPhone Raccourci?
There are several reasons why you might want to delete Automatisation iPhone Raccourci. For example:- You no longer need the shortcut - You've created too many shortcuts and want to clean up your device - The shortcut is causing issues on your deviceConclusion
In conclusion, Automatisation iPhone Raccourci is a useful feature on iPhones that allows you to automate tasks on your device. However, if you want to delete any of these shortcuts, it's a simple process that can be done through the Shortcuts app. By following the steps outlined in this article, you can easily delete any Automatisation iPhone Raccourci that you no longer need.Related video of Supprimer Automatisation iPhone Raccourci
If you are a gamer, you might have heard of Steam. It is a popular digital distribution platform that offers gamers access to thousands of games. However, sometimes Steam users encounter an error message that says "Steam fichiers téléchargés manquants" or "Missing Downloaded Files" in English. This error can be frustrating, especially if you have just downloaded a new game or update. In this article, we will explore what this error message means and how to fix it.
What Does "Steam Fichiers Téléchargés Manquants" Mean?
"Steam fichiers téléchargés manquants" is a French error message that translates to "Missing Downloaded Files" in English. This error message appears when Steam cannot find the files it needs to run a game or update. This can happen for several reasons, such as a corrupted download, a failed installation, or a problem with your computer's hardware or software.
How to Fix "Steam Fichiers Téléchargés Manquants"
If you encounter the "Steam fichiers téléchargés manquants" error message, there are several steps you can take to fix it. Here are some of the most common solutions:
1. Verify the Integrity of Game Files
The first step to fix this error is to verify the integrity of game files. This process will check if any files are missing or corrupted and replace them with new ones. To do this, follow these steps:
- Open Steam and go to your Library.
- Right-click on the game that is giving you the error message and select Properties.
- Click on the Local Files tab and then click on Verify Integrity of Game Files.
- Wait for the process to complete.
- Restart Steam and try launching the game again.
2. Delete Corrupted Files
If verifying the integrity of game files does not fix the error, you may need to delete the corrupted files manually. To do this, follow these steps:
- Open Steam and go to your Library.
- Right-click on the game that is giving you the error message and select Properties.
- Click on the Local Files tab and then click on Browse Local Files.
- Delete all the files in the game's folder except for the SteamApps and Userdata folders.
- Restart Steam and try launching the game again.
3. Reinstall the Game or Update
If both of the above solutions do not work, you may need to uninstall and reinstall the game or update. To do this, follow these steps:
- Open Steam and go to your Library.
- Right-click on the game that is giving you the error message and select Uninstall.
- Once the game is uninstalled, download and install it again.
- Restart Steam and try launching the game again.
4. Check Your Computer's Hardware and Software
If none of the above solutions work, the problem may be with your computer's hardware or software. Check your computer for any hardware issues, such as a failing hard drive or faulty RAM. You should also make sure that your computer's software is up to date and that you have the latest drivers installed.
Conclusion
The "Steam fichiers téléchargés manquants" error message can be frustrating, but there are several solutions that you can try to fix it. By verifying the integrity of game files, deleting corrupted files, reinstalling the game or update, and checking your computer's hardware and software, you should be able to resolve this error and get back to playing your favorite games on Steam.
Related video of Steam Fichiers Téléchargés Manquants: What It Is and How to Fix It
Introduction
Snapchat is one of the most popular social media platforms around, known for its unique features such as filters, lenses, and stories. Meanwhile, Samsung's Galaxy Watch 4 is the latest addition to the smartwatch market, equipped with advanced features such as GPS, heart rate monitor, and improved battery life. In this article, we will explore whether it is possible to use Snapchat on the Galaxy Watch 4, and what you need to know to make this happen.
Can You Use Snapchat on the Galaxy Watch 4?
The short answer is no, you cannot use Snapchat on the Galaxy Watch 4. Snapchat does not have an official app for smartwatches, including the Galaxy Watch 4. However, there are some workarounds that you can try to access Snapchat on your smartwatch.
Using Snapchat on Your Phone
One way to use Snapchat on your Galaxy Watch 4 is to use the app on your phone and then mirror your phone's screen onto your smartwatch. You can connect your phone to your watch via Bluetooth, and then use a screen mirroring app to display your phone's screen on your watch. However, this method can be clunky and may not provide the best user experience.
Alternative Apps
Another option is to use alternative apps that offer similar features to Snapchat. One example is Instagram, which also has filters, stories, and direct messaging. While Instagram does not have an official app for smartwatches, you can still use the app on your phone and receive notifications on your watch. Other alternative apps include WhatsApp, Telegram, and Viber, which also offer messaging and calling features.
Smartwatch Camera
One of the main features of Snapchat is the ability to take pictures and videos with your phone's camera and apply filters and lenses. However, the Galaxy Watch 4 does not have a built-in camera, which makes it difficult to use Snapchat's camera features. If you want to take pictures and videos with your watch, you may need to use an external camera and then transfer the files to your watch.
Conclusion
While it may not be possible to use Snapchat on the Galaxy Watch 4, there are still alternative apps and workarounds that you can try. Whether you want to use Instagram, WhatsApp, or other messaging apps, you can still stay connected with your friends and family from your watch. As technology continues to evolve, we may see more social media apps and features become available on smartwatches in the future.
Related video of Snapchat on Galaxy Watch 4: Is It Possible?
If you’re using Windows 10, you might have noticed that your mouse sensitivity is not what you’re used to. This can be frustrating, especially if you’re a gamer or if you work with programs that require precise mouse movements. Fortunately, Windows 10 offers a variety of mouse settings that you can adjust to suit your needs. In this article, we’ll explore some tips and tricks on how to adjust your mouse sensitivity in Windows 10.
What is Mouse Sensitivity?
Mouse sensitivity is how fast your cursor moves in relation to how fast you physically move your mouse. If your mouse sensitivity is too high, your cursor will move too quickly, making it difficult to control. On the other hand, if your mouse sensitivity is too low, your cursor will move too slowly, making it difficult to navigate your computer. Finding the right balance between sensitivity and control is important, especially if you’re using your computer for extended periods of time.
Adjusting Mouse Sensitivity in Windows 10
Windows 10 offers several ways to adjust your mouse sensitivity. Here’s how:
Method 1: Using the Mouse Settings Menu
1. Click on the Start menu and select Settings.
2. Click on Devices.
3. Click on Mouse in the left-hand menu.
4. Under the Mouse Sensitivity section, use the slider to adjust your mouse sensitivity. You can also adjust your mouse speed in the right-hand menu.
Method 2: Using the Control Panel
1. Click on the Start menu and type Control Panel.
2. Click on Control Panel in the search results.
3. Click on Hardware and Sound.
4. Click on Mouse.
5. Click on the Pointer Options tab.
6. Under Motion, use the slider to adjust your mouse sensitivity.
Other Ways to Improve Mouse Sensitivity in Windows 10
Aside from adjusting your mouse sensitivity in the settings menu, there are other ways to improve your mouse performance in Windows 10:
1. Update Your Mouse Driver
Outdated mouse drivers can cause issues with your mouse sensitivity. Make sure your mouse driver is up to date by checking the manufacturer’s website for the latest version.
2. Clean Your Mouse
Dirt and debris can interfere with your mouse movements, affecting your sensitivity. Clean your mouse regularly with a damp cloth to remove any dirt or grime.
3. Use a Mouse Pad
A mouse pad can improve your mouse sensitivity by providing a smooth surface for your mouse to move on. Look for a mouse pad with a surface that’s suitable for your mouse type (e.g. optical, laser).
Conclusion
Adjusting your mouse sensitivity in Windows 10 is a simple process that can greatly improve your user experience. Whether you’re a gamer or a professional, finding the right balance between sensitivity and control is important for optimal productivity. By following the tips and tricks outlined in this article, you can improve your mouse performance and get the most out of your Windows 10 experience.
Related video of Sensibilité souris Windows 10: Tips and Tricks to Adjust Your Mouse Settings
Apple Watch is not just a stylish accessory, but also a useful tool that can help you track your fitness goals, receive notifications, and stay connected with others. However, like any electronic device, it is not immune to problems such as data loss, accidental deletion, or system crashes. That's why it's important to back up your Apple Watch regularly, so that you can restore your data in case of any issues. In this article, we will guide you through the process of sauvegarde Apple Watch (backing up your Apple Watch) to ensure that your data is safe and secure.
Why Backing Up Your Apple Watch is Important
Backing up your Apple Watch is important because it helps you protect your data and settings from loss or damage. If your Apple Watch is lost, stolen, or damaged, or if you accidentally delete some important data, you can restore your data from a backup without any hassle. Also, if you upgrade to a new Apple Watch or reset your current one, you can easily transfer your settings and data to the new device by restoring from a backup. So, if you want to ensure that your Apple Watch data is safe and easily accessible, sauvegarde Apple Watch is a must.
How to Sauvegarde Apple Watch
There are two ways to sauvegarde Apple Watch: using iCloud or your iPhone. Let's take a look at each method in detail:
Using iCloud
To sauvegarde Apple Watch using iCloud, make sure that your Apple Watch is connected to Wi-Fi and placed on its charger. Then, follow these steps:
- Open the Watch app on your iPhone.
- Tap on the My Watch tab at the bottom of the screen.
- Tap on General.
- Tap on Sauvegarde Apple Watch.
- Tap on Sauvegarder maintenant.
Your Apple Watch will start sauvegarde (backing up) to iCloud. The sauvegarde process may take some time depending on the size of your data, so make sure that your Apple Watch is connected to Wi-Fi and placed on its charger until the sauvegarde is complete.
Using Your iPhone
You can also sauvegarde Apple Watch using your iPhone. To do this, follow these steps:
- Make sure that your iPhone is connected to Wi-Fi and has enough storage space to sauvegarde your Apple Watch.
- Open the Watch app on your iPhone.
- Tap on the My Watch tab at the bottom of the screen.
- Tap on General.
- Tap on Sauvegarde Apple Watch.
- Select Sauvegarder sur cet iPhone.
- Tap on Sauvegarder maintenant.
Your Apple Watch will sauvegarde to your iPhone. The sauvegarde process may take some time depending on the size of your data, so make sure that your iPhone is connected to Wi-Fi and has enough storage space until the sauvegarde is complete.
Restoring from a Backup
If you need to restore your Apple Watch from a backup, follow these steps:
- Make sure that your Apple Watch is paired with your iPhone.
- Open the Watch app on your iPhone.
- Tap on the My Watch tab at the bottom of the screen.
- Tap on General.
- Tap on Sauvegarde Apple Watch.
- Choose the backup you want to use.
- Tap on Restaurer la sauvegarde.
Your Apple Watch will start restoring from the selected backup. The restore process may take some time depending on the size of your data, so make sure that your Apple Watch is connected to Wi-Fi and placed on its charger until the restore is complete.
Conclusion
Backing up your Apple Watch is an essential step to protect your data and settings from loss or damage. Whether you use iCloud or your iPhone, sauvegarde Apple Watch is easy and straightforward. By following the steps mentioned in this article, you can ensure that your Apple Watch data is safe and easily accessible. So, don't forget to sauvegarde Apple Watch regularly!
Related video of Sauvegarde Apple Watch: How to Back Up Your Device
Introduction to Rog Gaming Center
Rog Gaming Center is a state-of-the-art gaming facility that offers a one-of-a-kind gaming experience. It is designed to cater to the needs of both casual and professional gamers who are looking for a high-quality gaming environment. The facility is equipped with the latest gaming equipment and technology, providing gamers with the ultimate gaming experience.
The Gaming Equipment
The Rog Gaming Center is equipped with the latest gaming equipment, including high-end gaming PCs, monitors, and other gaming accessories. The gaming PCs are powered by the latest and most powerful processors, graphics cards, and storage devices, ensuring that gamers can play the latest games at the highest settings without any lag or performance issues.
The Gaming Environment
The Rog Gaming Center provides a comfortable and spacious gaming environment that is designed to enhance the gaming experience. The facility is equipped with comfortable seating, adequate lighting, and a cool temperature to ensure that gamers can play for hours without any discomfort. The gaming environment is also designed to be distraction-free, allowing gamers to focus on their games without any distractions.
The Games
The Rog Gaming Center offers a wide variety of games, including the latest and most popular titles. From first-person shooters to sports games, there is something for everyone. The facility also offers multiplayer games, allowing gamers to compete against each other and test their skills.
The Staff
The staff at the Rog Gaming Center are experienced gamers and are passionate about gaming. They are knowledgeable about the latest games and equipment and are always available to assist gamers with any questions or concerns. The staff also provides tips and tricks to help gamers improve their skills and enjoy the games even more.
The Prices
The Rog Gaming Center offers affordable prices, making it accessible to a wide range of gamers. The facility offers hourly rates and package deals, allowing gamers to choose the option that best suits their needs and budget. The prices are competitive and reasonable, considering the high-quality gaming equipment and environment offered by the facility.
The Benefits of Gaming
Gaming has several benefits, including improving cognitive skills, enhancing creativity, reducing stress, and providing social interaction. The Rog Gaming Center provides a platform for gamers to enjoy these benefits while having fun and interacting with other gamers.
The Future of Rog Gaming Center
The future of the Rog Gaming Center looks bright, with plans to expand and introduce new and exciting games and features. The facility is committed to providing gamers with the ultimate gaming experience and is continuously striving to improve and innovate.
Conclusion
The Rog Gaming Center is the ultimate gaming destination for both casual and professional gamers. With high-end gaming equipment, a comfortable gaming environment, a wide variety of games, knowledgeable staff, affordable prices, and several benefits, the facility provides a one-of-a-kind gaming experience. The future looks bright for the Rog Gaming Center, and it is undoubtedly a must-visit for any gaming enthusiast.
Related video of Rog Gaming Center: The Ultimate Gaming Experience

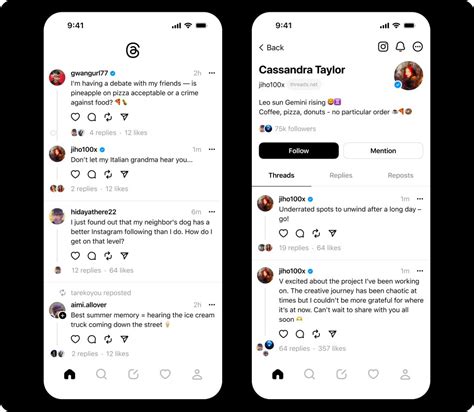
Instagram is a popular social media platform used by millions of people around the world. It allows users to share photos, videos, and messages with their followers and friends. If you have received a message on Instagram, it is important to respond in a timely and appropriate manner. In this article, we will discuss how to respond to a message on Instagram.
Step 1: Open the Instagram App

The first step to responding to a message on Instagram is to open the Instagram app on your mobile device. If you do not have the app, you can download it for free from the App Store or Google Play. Once you have the app installed, log in to your account.
Step 2: Navigate to Your Inbox

Once you have logged in to your account, navigate to your inbox by tapping the icon in the top right corner of the screen. This will take you to your direct messages.
Step 3: Find the Message You Want to Respond to
Scroll through your inbox to find the message you want to respond to. You can also use the search bar at the top of the screen to search for specific messages or users.
Step 4: Tap on the Message
Once you have found the message you want to respond to, tap on it to open the message thread. This will allow you to view the entire conversation and respond to the message.
Step 5: Type Your Response

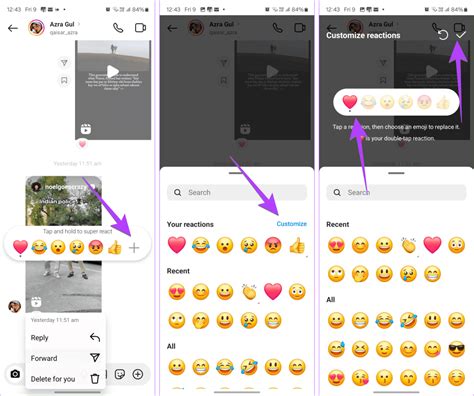
Once you have opened the message thread, type your response in the text box at the bottom of the screen. You can also add emojis, photos, or videos to your response by tapping the corresponding icons.
Step 6: Send Your Response

After you have typed your response, tap the send button to send it. The send button is located to the right of the text box. Once you have sent your response, it will appear in the message thread.
Step 7: Continue the Conversation
If the person you are responding to replies back, you can continue the conversation by following the same steps. You can also archive or delete the message thread by swiping left on the message and selecting the appropriate option.
Tips for Responding to Messages on Instagram

Here are some tips to keep in mind when responding to messages on Instagram:
- Respond in a timely manner
- Be polite and professional
- Avoid using inappropriate language or content
- Don't spam or send unsolicited messages
- Use emojis or photos to add personality to your responses
Conclusion
Responding to messages on Instagram is a simple process that can help you stay connected with your followers and friends. By following these steps and tips, you can ensure that your responses are timely, appropriate, and professional.
Related video ofHow to Respond to a Message on Instagram
Windows 11 is the latest operating system from Microsoft, and it comes with a lot of exciting new features. One of the most noticeable changes is the taskbar, which has been redesigned to be more modern and streamlined. However, some users may find the taskbar too big or distracting. In this article, we will show you how to reduce the size of the taskbar in Windows 11.
Method 1: Using the Taskbar Settings
The easiest way to change the size of the taskbar in Windows 11 is to use the taskbar settings. Here's how:
- Right-click on the taskbar.
- Select "Taskbar settings".
- Scroll down to the "Taskbar behaviors" section.
- Find the "Taskbar alignment" option and select "Center" or "Left".
- Turn on the "Use small taskbar buttons" option.
- Adjust the "Taskbar height" slider to your desired size.
By following these steps, you can make the taskbar smaller and less distracting. You can also experiment with different taskbar alignments and button sizes to find the perfect setup for your needs.
Method 2: Using the Registry Editor
If you're comfortable with editing the Windows Registry, you can also use this method to change the size of the taskbar in Windows 11. Here's how:
- Press the Windows key + R to open the Run dialog box.
- Type "regedit" and press Enter.
- Navigate to the following key: HKEY_CURRENT_USER\Control Panel\Desktop\WindowMetrics
- Find the "MinWidth" value and double-click on it.
- Change the value data to a smaller number (e.g., 40) and click OK.
- Close the Registry Editor.
- Restart your computer to see the changes take effect.
This method requires more technical knowledge, so it's not recommended for beginners. Editing the Windows Registry can be risky, so make sure you create a backup before making any changes.
Conclusion
Reducing the size of the taskbar in Windows 11 can help you focus on your work and improve your productivity. By following the methods outlined in this article, you can customize the taskbar to your liking and make it work for you.